Producing with an external application (Teams Encoder Event)
External applications for production (encoders)
Definition
Compresses audio and video from various inputs and sends that output to a streaming service.
Settings
RTMP(s) – single bitrate
Video:
- Codec: H.264, High
- Fragment size: 2 sec
- Bitrate: up to 5 Mbps, CBR, 30 fps
- Resolution: Max 720p
Audio:
- Codec: AAC-LC
- Bitrate: 192 kbps
- Sample rate: 48Khz
Note: both audio and video must be present.
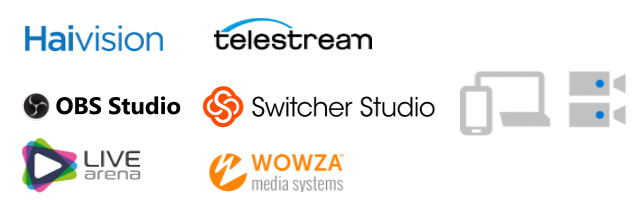
Popular encoders
Introduction to advanced production workflow with an external application
Schedule
Organizer
Organizer
Produce using app/device
Producer
RTMP Device
Going live
Producer
Producer
Cloud delivery
Azure Media Services
Content Delivery Network
Network optimization
(eCDN Solutions)
View
Audience
Watch on desktop,
web, mobile
Joining as a Producer – from Teams or Outlook
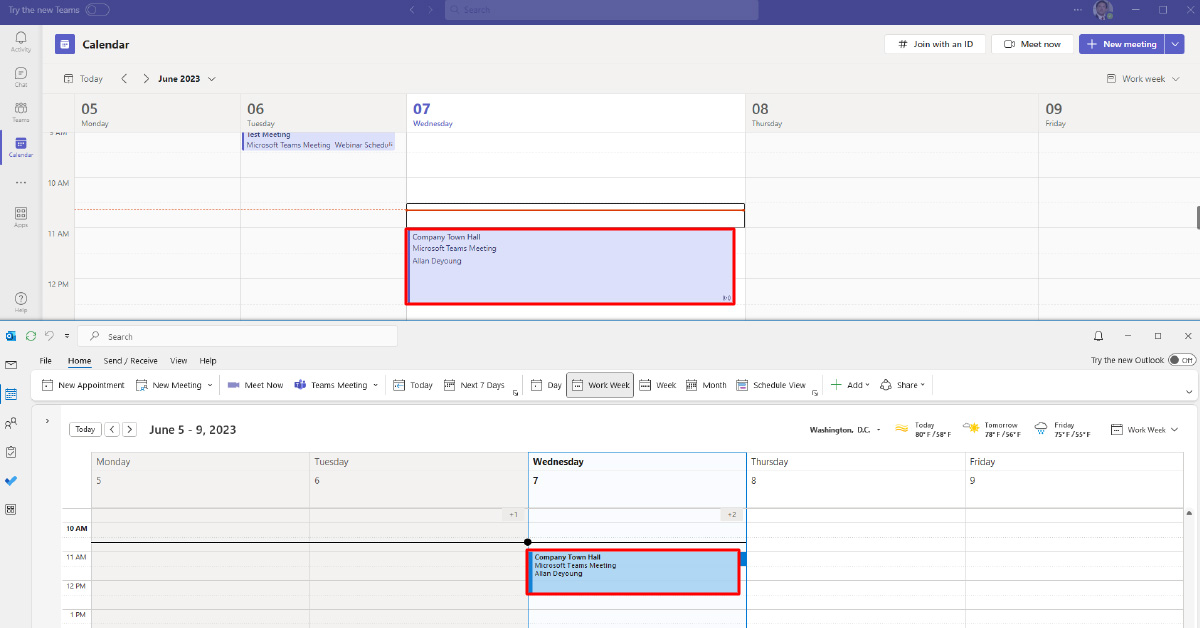
Join the live event as a Producer or Presenter from your Teams calendar or from your Outlook Calendar.


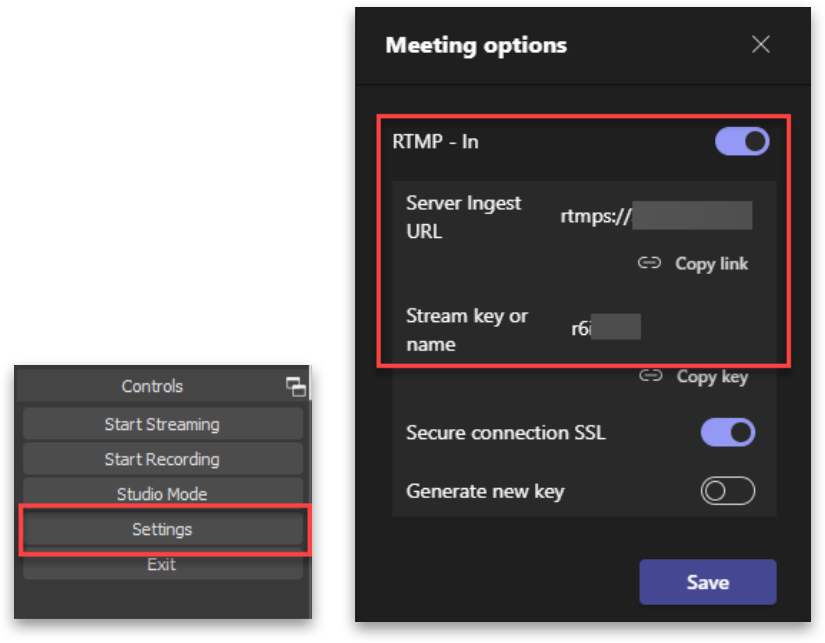
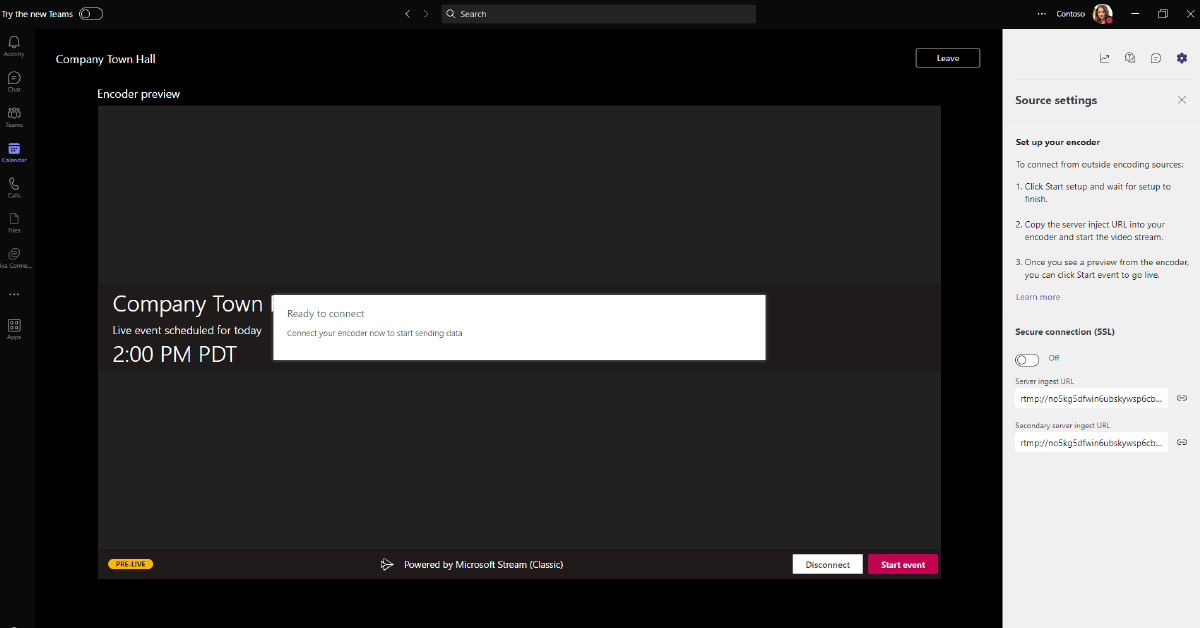
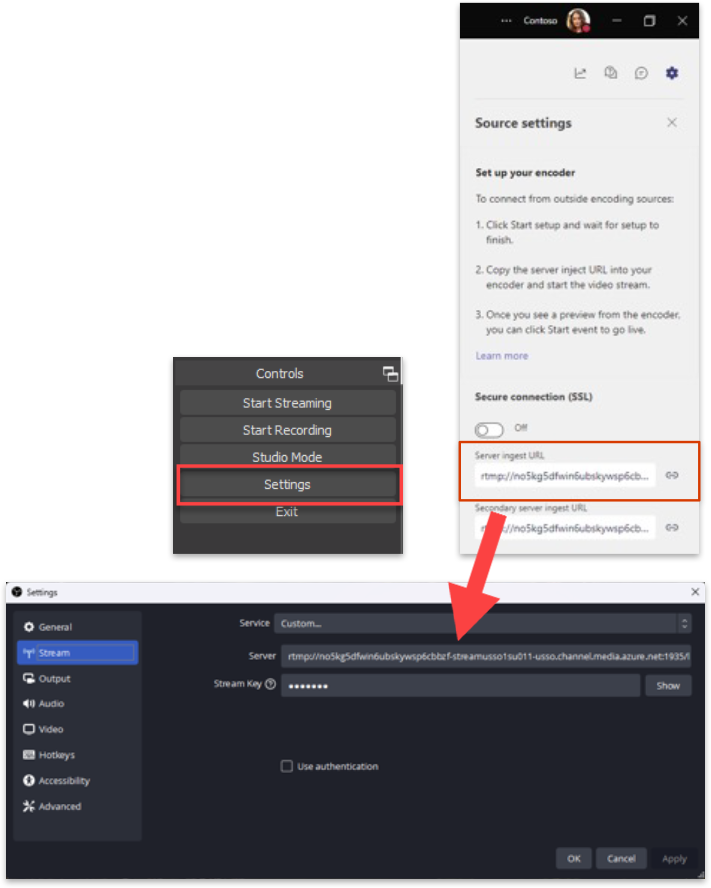
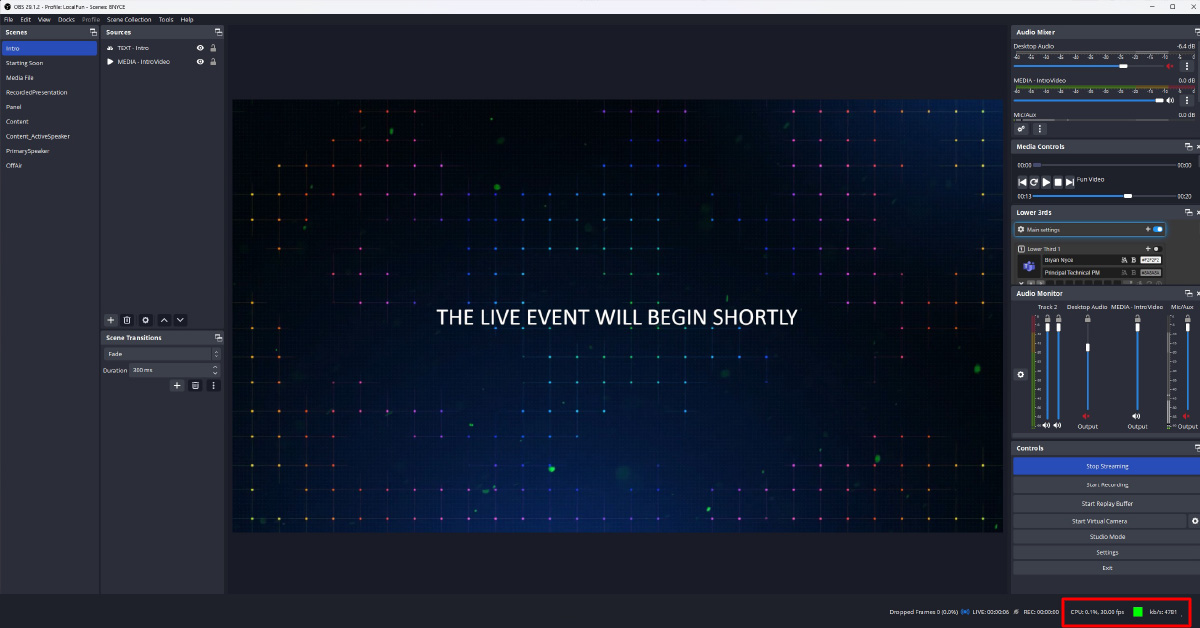
Connecting your encoder (OBS example)
In your encoding software, provide the RTMP ingest URL(s) to connect the output of the encoder to the live event.
In OBS Studio, go to the Controls dock, and click Settings.
- In the Service dropdown, select Custom…
- In the Server textbox, paste in the value from RTMP – In Server Ingest Url.
- In the Stream Key box, enter the value from RTMP – In Stream Key or name.
- Click Ok (or Apply).

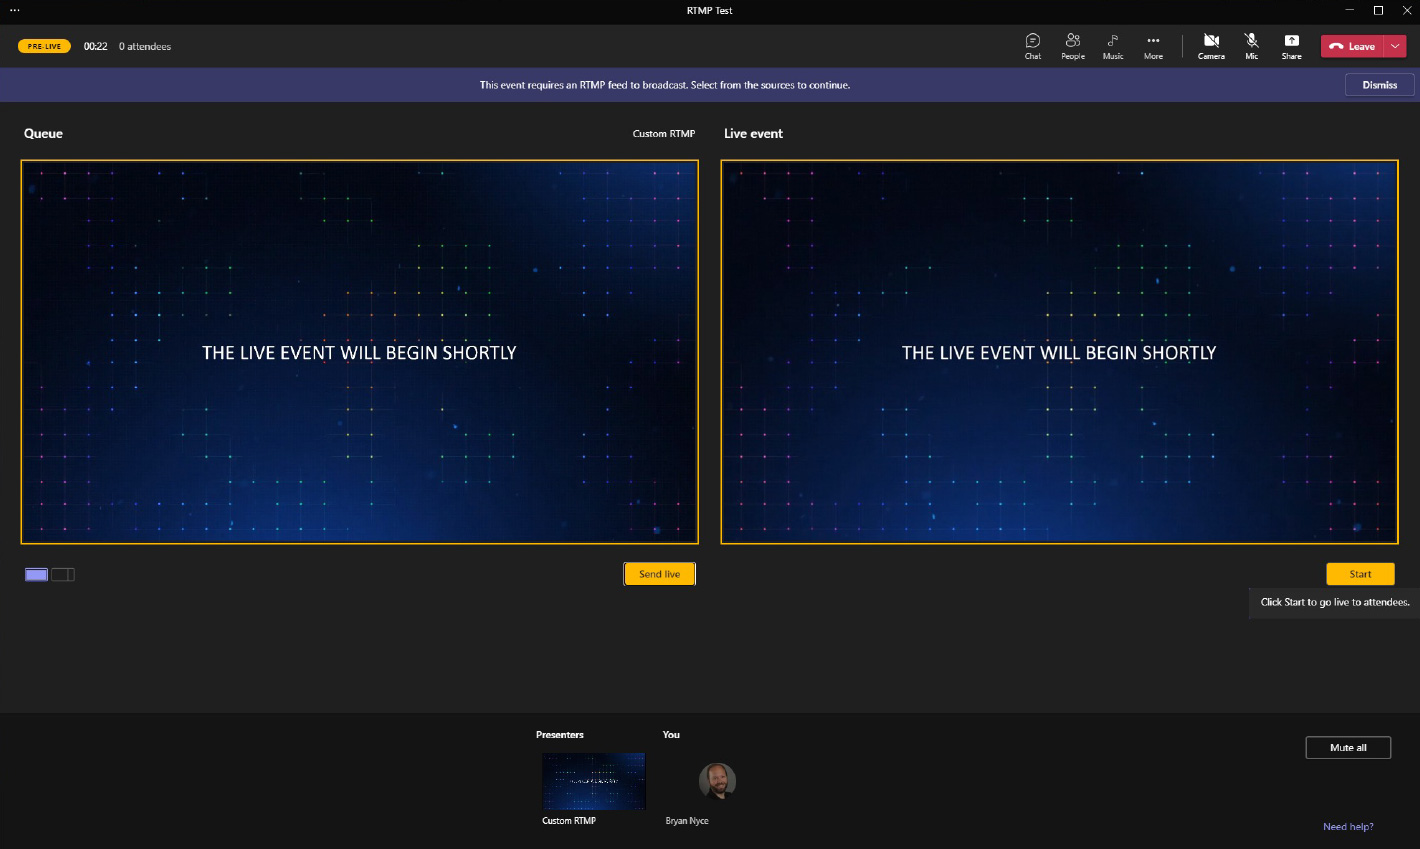
Queuing your encoder content
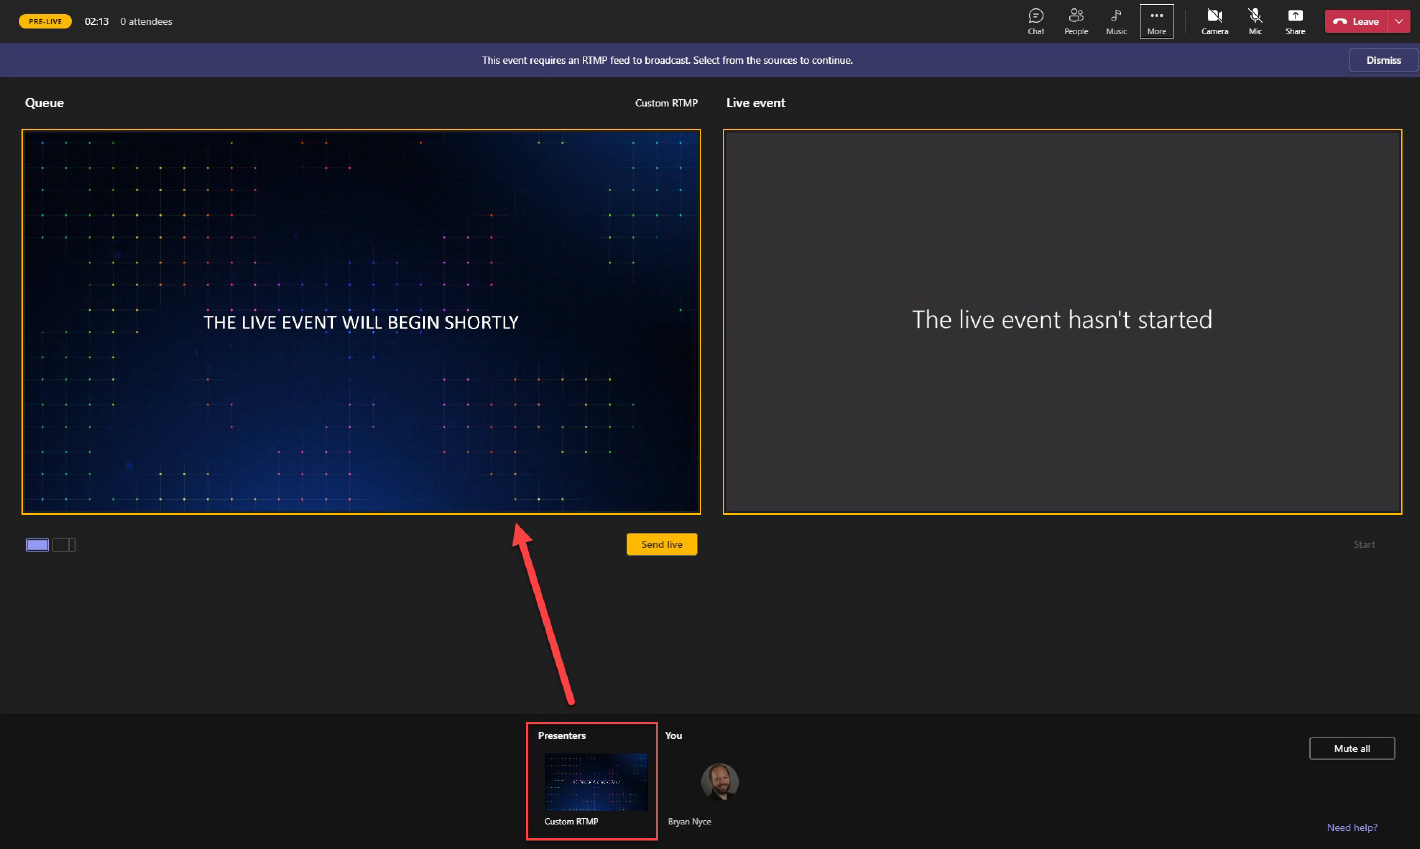
Send live and Start
Producing with an external application (Stream Encoder Event)
Considerations on leveraging Teams within virtual events:
| Product | Teams meeting Teams webinar |
Microsoft 365 live event produced via Teams | Live events Teams Encoder or Stream Encoder |
| Delivery platform | |||
| Audience |
Internal External |
Internal External |
Internal (Azure AD Guests supported with Teams Encoder only) External (Teams Encoder only) |
| Access |
Authenticated or Anonymous (Meetings) Registration (Webinars) |
Internal: Org-wide or People and Groups (Azure AD account required [member/Guest]) External: Public (no sign-in required) |
Internal: Org-wide or People and Groups (Azure AD account required [member/Guest]) External: Public (no sign-in required) – Teams Encoder only |
| Audience size | 1000 interactive, 20k with View only (Meetings) 1000 limit (currently for webinars) |
10k (20k through Dec 31, 2023) | 10k (20k through Dec 31, 2023) |
| Run yourself (no production involvement) | Yes | Yes | No |
| Hardware requirements | PC/Camera | PC/Camera | Production (cameras audio, live switching) + Encoder (hardware or software) |
| Duration | 30 hours | 16 hours (through Dec 31, 2023) | 16 hours (through Dec 31, 2023) |
|
Live mixing of sources/presenters in meeting Distinct roles empower Producers, Presenters, and Attendees |
No | Yes | No |
| Captions | Live Captions (Built-in using AI technology) CART Captions (Human generated) |
AI Captions (Teams) | 608/708 Captions (Teams Encoder only) |
| Caption translations | Yes (using AI technology) | Up to 6 languages (using AI technology) | No |
| Moderated Q&A (Chat) | Available | Available | Available |
| Unmoderated Q&A (Chat) | Yes | No | No |
| Verbal Q&A within platform | Yes | Presenters only | Presenters only |
| Automatic live to VOD transition |
No |
Yes | Yes |
| Reporting | Attendee reporting |
Unique viewership GEO Viewing duration Individual aliases |
Unique viewership GEO Viewing duration Individual aliases (Teams Encoder only) |
Audience
Production
Captions
Interactivity
Post-event
Joining as a Producer – from Teams or Outlook
Join the live event as a Producer or Presenter from your Teams calendar or from your Outlook Calendar.
Joining as a Presenter (Moderated Q&A)
When a live event scheduled in Teams is produced using an external app or encoder, Presenters for this event will not have any type of audio/video capabilities. They will be able to moderate the Q&A panel (if enabled), chat with the producer(s) and view the live stream within the client.
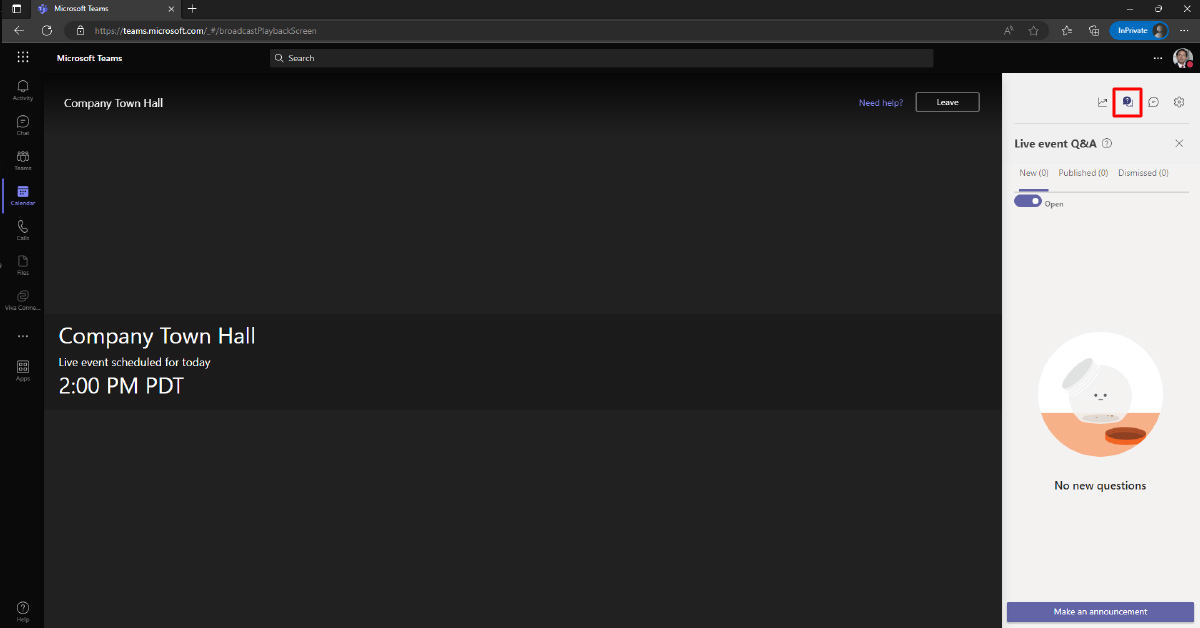
The Presenters have access here to the moderated Q&A.
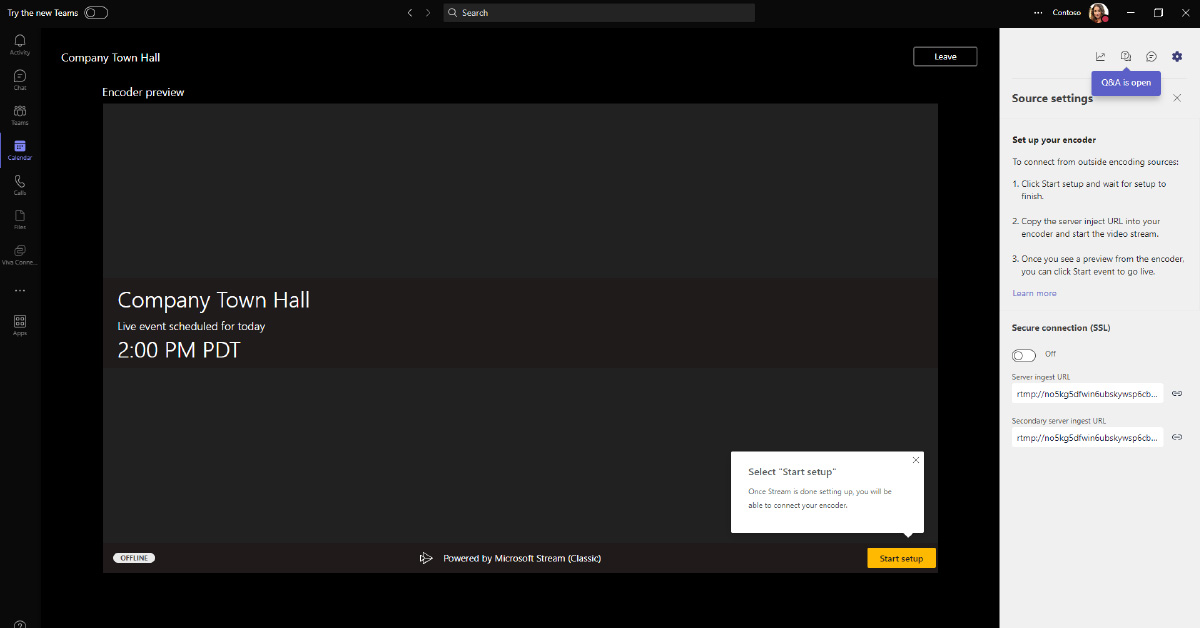
Connecting your encoder (OBS example)
In your encoding software, provide the RTMP ingest URL(s) to connect the output of the encoder to the live event.
In OBS Studio, go to the Controls dock, and click Settings.
- In the Service dropdown, select Custom…
- In the Server textbox, paste in the value from RTMP – In Server Ingest Url.
- In the Stream Key box, enter any value (such as 12345).
Note: Teams live events with Stream do not utilize a Stream Key; however, the OBS Studio software requires that a value be entered into this field.
The Secondary server ingest URL (also called the Redundant server ingest URL) is not intended as a backup. The encoder pushes content to both the primary and redundant ingest URLs with the same timestamp and data, which improves the content’s durability and resiliency.
Connecting your encoder
Note that when Start Streaming is clicked here, this will begin sending the output from the app/encoder to the live event. This does NOT make the event live for the attendees to view. That must be done within the Teams Producer experience.
Verify that the streaming process is working. The producer will see a preview in the Teams client (delayed by roughly 30 seconds).
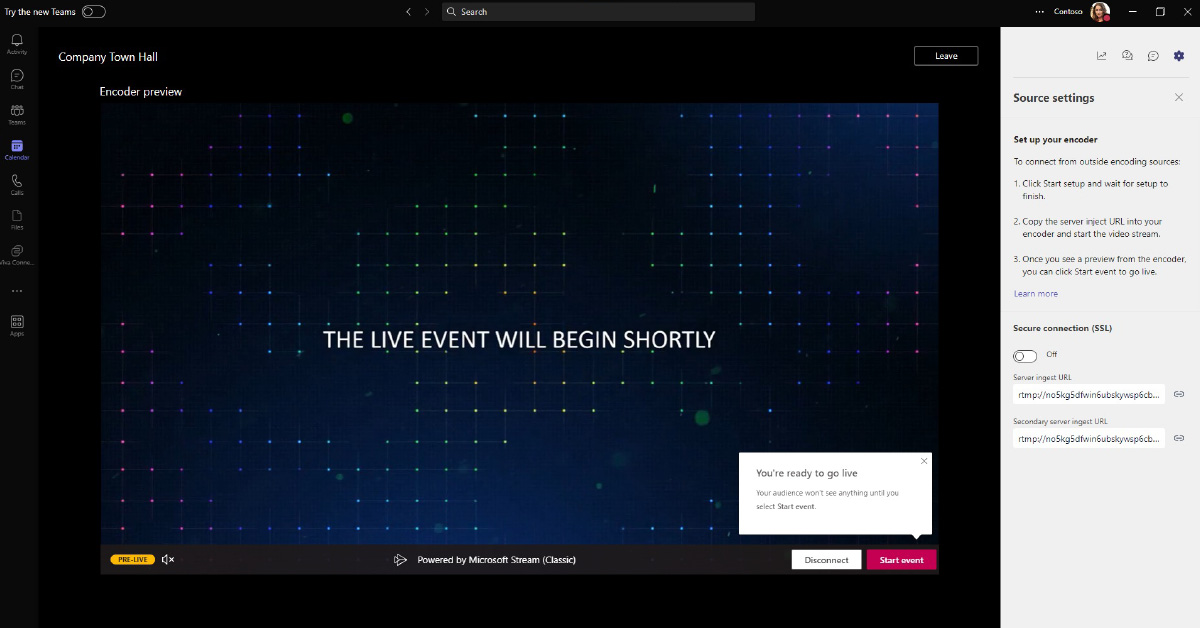
When ready, click the Start event button to GO LIVE!
REMINDER: once the event is started, it can only be stopped (not paused or restarted).
Extracting sources from Teams
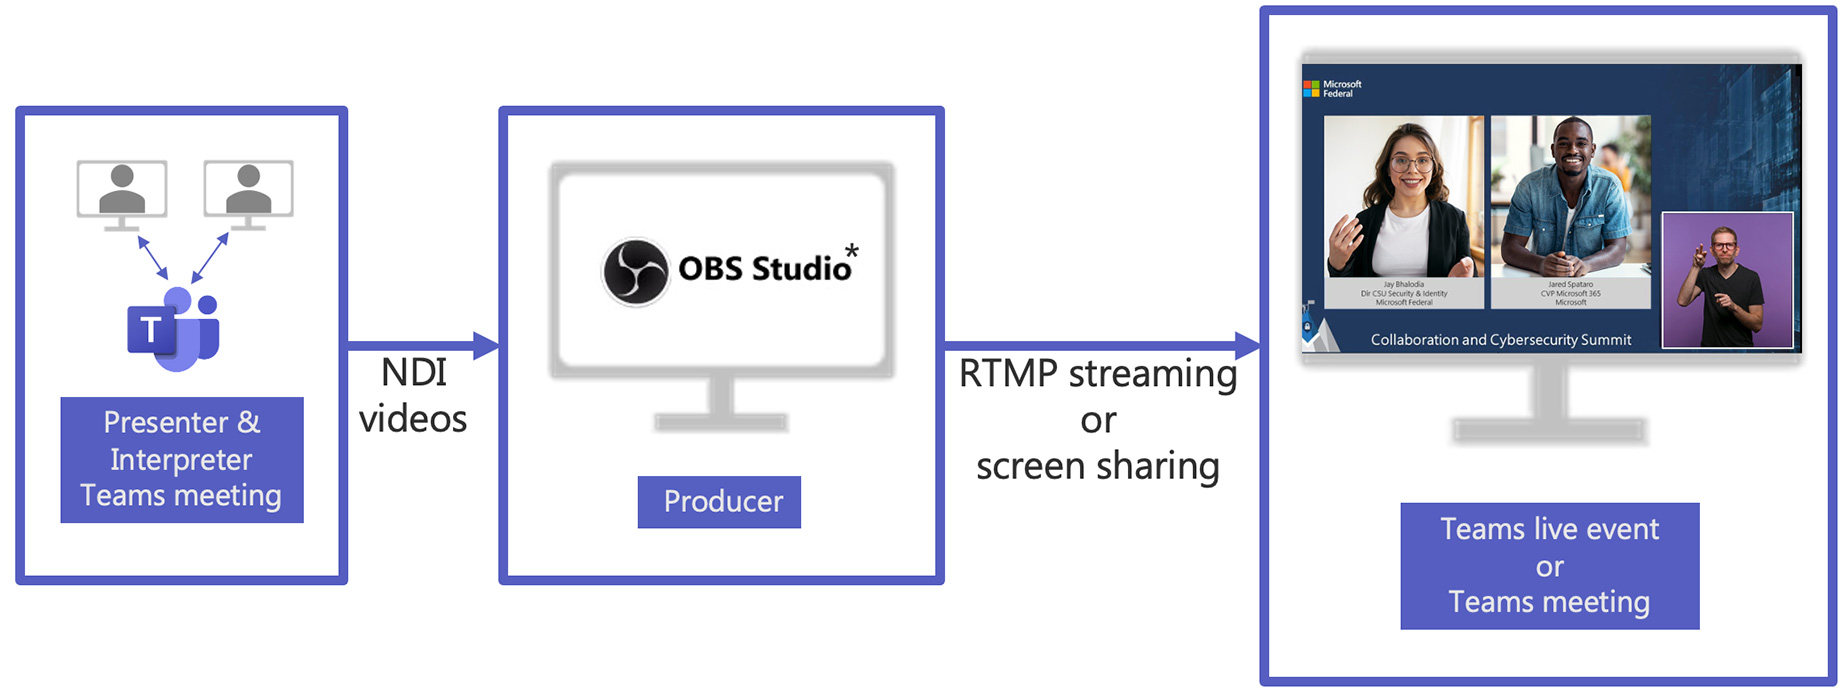
Extracting content from a Teams meeting (source)
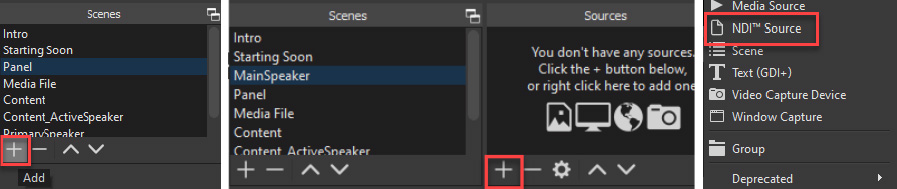
Using NDI
Remote participants
Teams meeting
Source
This system joins the Teams meeting and uses NDI to extract the isolated video feeds and mixed audio feed.
Enable NDI in the Teams client (Settings -> App Permissions).
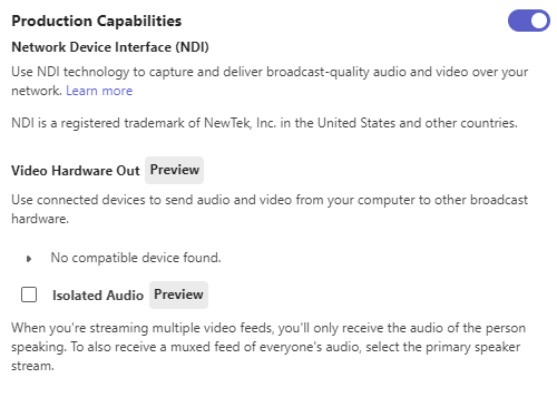
Ensure video feeds are active in the Teams client.
- Pin select videos as desired (max of 9 video feeds; however, this is influenced by hardware and network, and generally will not exceed 2-3 per machine)
- Invoke the Large Gallery (optional, if desired)
- Invoke the Together Mode (optional, if desired)
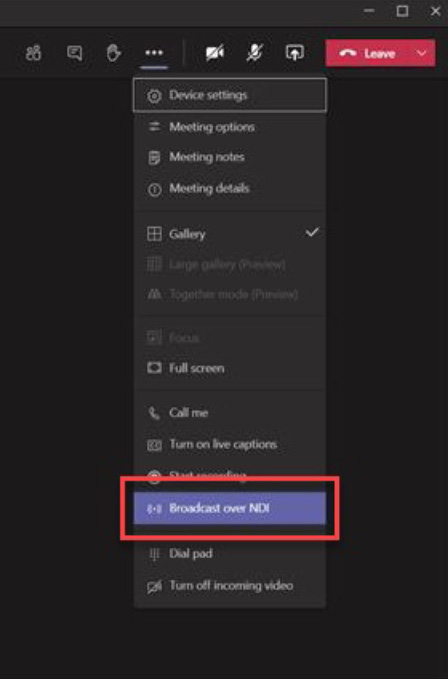
Enable Broadcast over NDI in the Teams meeting
NDI feeds contain mixed audio of all participants, except the user on the Source machine – check the Isolated Audio checkbox to enable individual audio for each NDI feed
Extracting content from a Teams meeting (source)
Using hardware out
This is commonly used to integrate into traditional production environments using SDI connections.
Remote participants
Teams meeting
Source
This system joins the Teams meeting and uses an external device (AJA or Blackmagic) to extract video feeds.
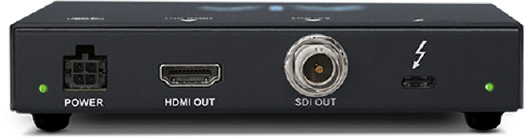
AJA T-Tap Pro
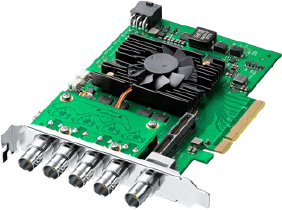
BlackMagic Decklink
- You can extract one clean stream per output from the Teams meeting.
- Devices with multiple outputs can receive a unique clean stream per output.
- Individual (ISO) video feeds only (does not support Large Gallery, Together Mode or Desktop Sharing).
Remote participants
Teams meeting
Source
This system joins the Teams meeting and uses an external device (AJA or Blackmagic) to extract video feeds.
AJA T-Tap Pro
BlackMagic Decklink
- You can extract one clean stream per output from the Teams meeting
- Devices with multiple outputs can receive a unique clean stream per output
- Individual (ISO) video feeds only (does not support Large Gallery, Together Mode or Desktop Sharing)
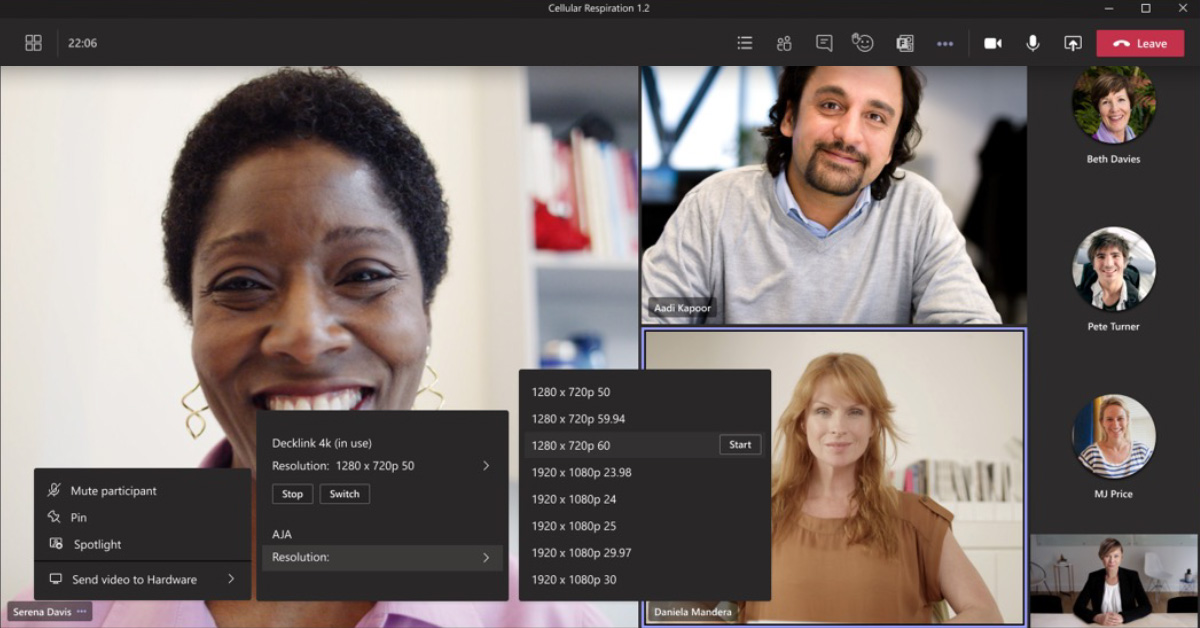
- NDI must be enabled in the Teams client (Settings -> Permissions -> enable the NDI slider).
- On the source machine, right click the video feed, and choose Send video to hardware.
- On the next flyout screen, locate the device/interface you intend to use.
- Click Resolution and select the desired resolution from the flyout window – then click Start.
Broadcast Development Kit
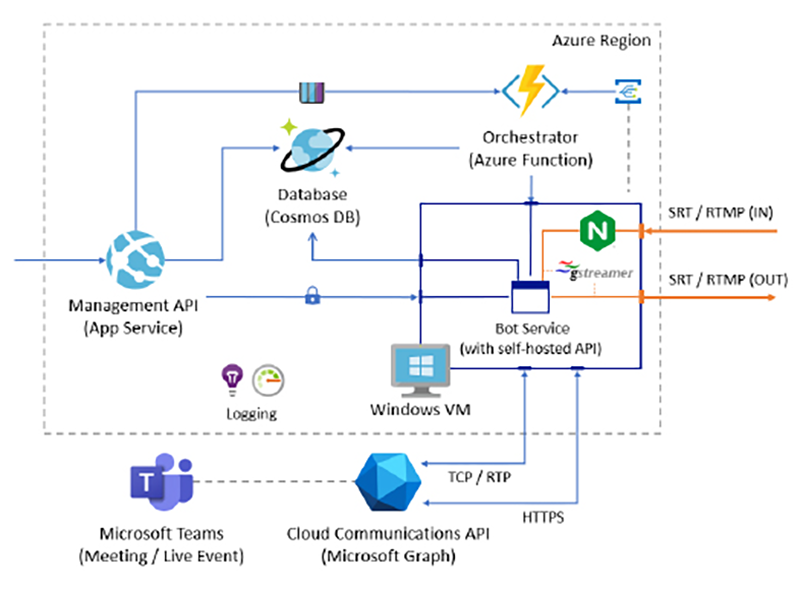
Broadcast Development Kit is a software solution that allows organizations to use a Teams meeting in their tenant as a source (and destination) to extract and inject media streams from the meeting (e.g., participants, screen share, etc.) and use them as sources for producing live content.
The Broadcast Development Kit provides features both to extract and inject media from a Teams meeting using either the SRT or the RTMP protocols. We recommend using the SRT protocols whenever possible and use RTMP (and RTMPS) if the system receiving/sending the feed does not support SRT.
The solutions works by adding a media bot to the meeting where you want to use this solution and using that media bot to capture the streams from the meeting and injecting new streams into it.
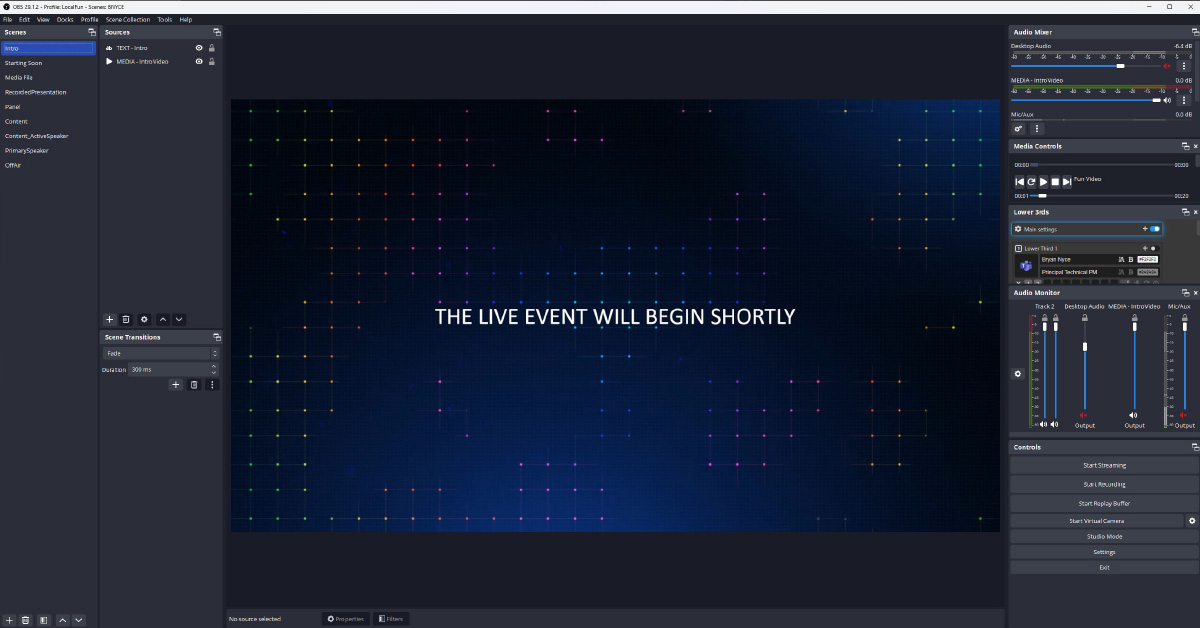
Producing with OBS Studio
OBS settings for live events
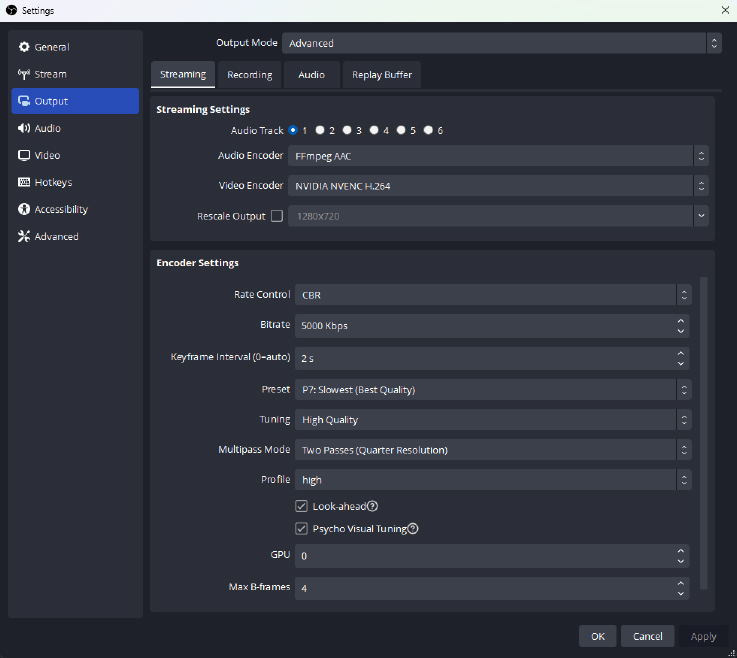
- Launch OBS, go to File -> Settings.
- Click Output, then choose Advanced output mode and configure following settings under the Streaming tab:
- Rescale Output: Check the box and select 1280×720
- Encoder: If your PC supports hardware encoding pick the one that’s not x264 (ex QuickSync H.264, NVENC, etc.). If hardware encoding isn’t an option leave it as x264.
- Rate Control: Make sure CBR is selected.
- Bitrate: Enter a value in kbps, 2000 to 4000 is what is normally used.
- Keyframe Interval: 2.
- Still on the Output tab, click the Audio tab -> Configure Track 1 -> Audio Bitrate: 128, 160, or 192 for audio encoding.
- Click Video (on the left side) and configure the following settings:
- Base (Canvas) Resolution: This is your normal desktop resolution (usually 1920 x 1080).
- Output (Scaled) Resolution: 1280 x 720 (Encoder Profiles are maxed at 720p for live events).
- Common FPS Values: 30 is normally used for frames per second.
The above settings are using the NVIDA RTX 2080 Ti card. Target resolution is 1280×720 and framerate 30fps. See this guide for details information related to NVIDIA configuration.
Production System – Bringing in sources (OBS NDI example)
Isolated video
NDI
Streaming app (OBS)
Graphics
Producer
This system runs the production software (OBS, Wirecast, vMix) to produce the desired layouts. From this machine/application, you can send the feed to your external audience.
Install OBS and the OBS NDI Plugin (requires restart).
In OBS, create a new Scene, and add a new NDI source.
Select the feed desired, and position into the scene.
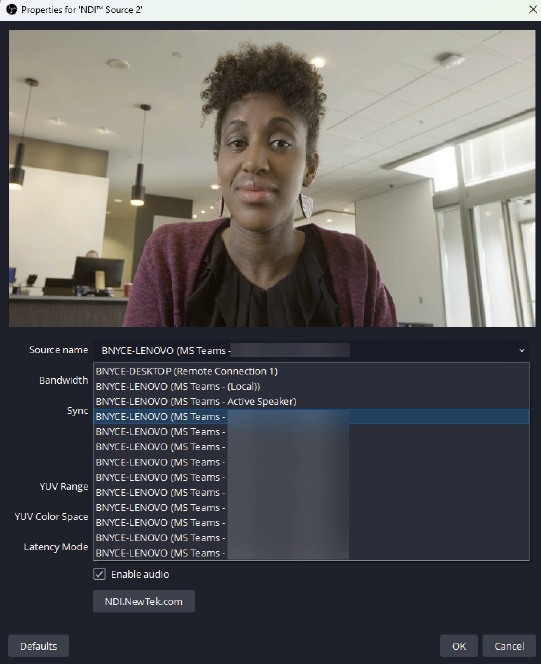
Video Preview/Assurance Slate.
List of available NDI feeds on the local network. Feed shows the source machine name, application and descriptor.
Audio considerations
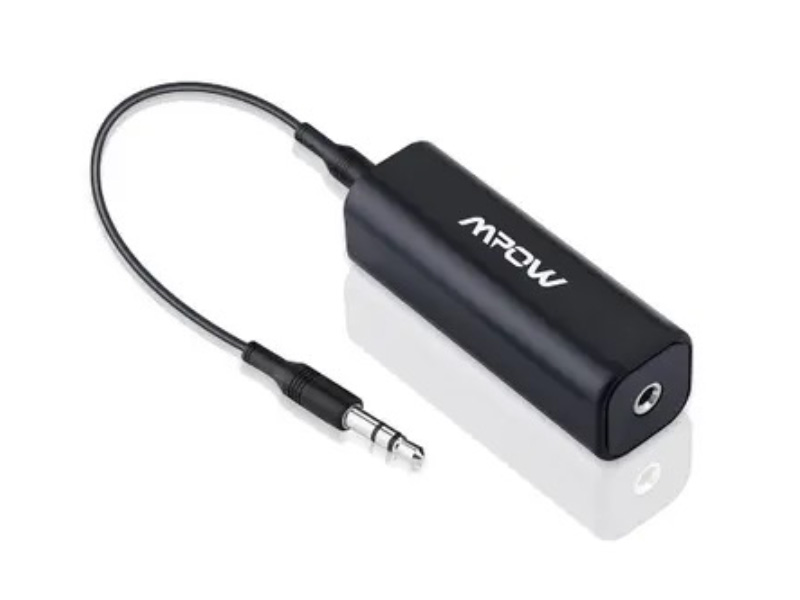
Ground Loop Isolators: used to eliminate the buzzing sound made by a ground loop, which occurs when multiple pieces of sound equipment are connected to each other.
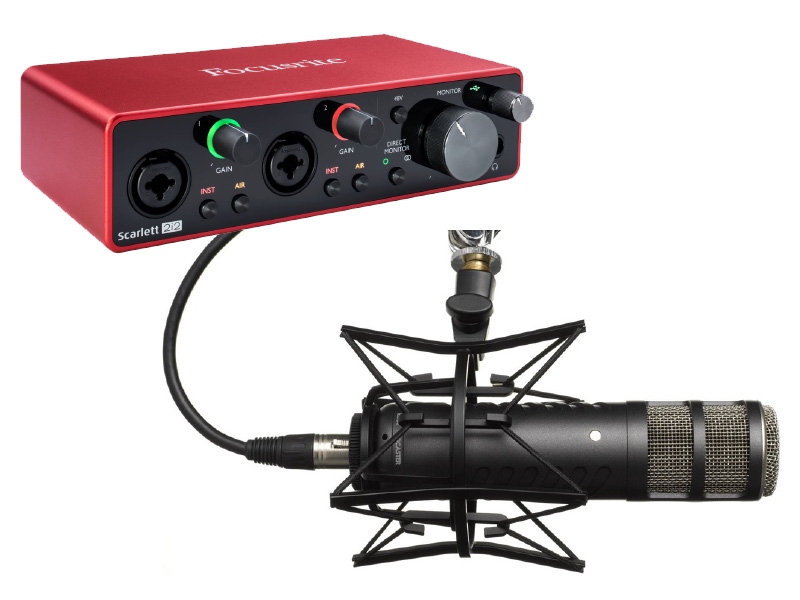
Quality microphones and audio interfaces.
Physical Audio Mixers: used to bring together multiple audio sources, such as microphones, USB-connected devices, AUX connections, Bluetooth.
Virtual Audio Mixers: powerful audio routing using physical and virtual interfaces.
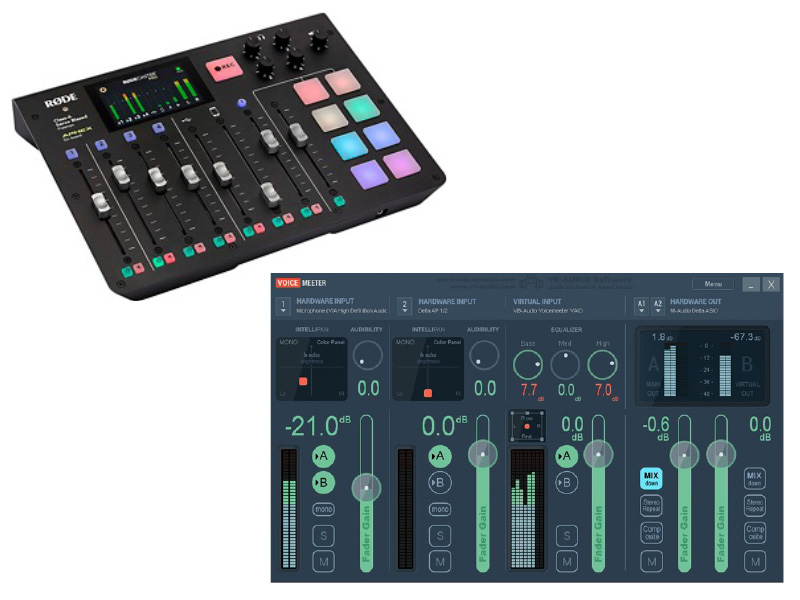
Audio routing – VoiceMeeter
VoiceMeeter is an example of a virtual mixing console.
Version
- VoiceMeeter (3 audio inputs/outputs)
- VoiceMeeter Banana (5 audio inputs/outputs)
- VoiceMeeter Potato (8 audio inputs/outputs)
The steps in this section will use VoiceMeeter Potato; however, the concepts apply equally to VoiceMeeter and VoiceMeeter Banana.
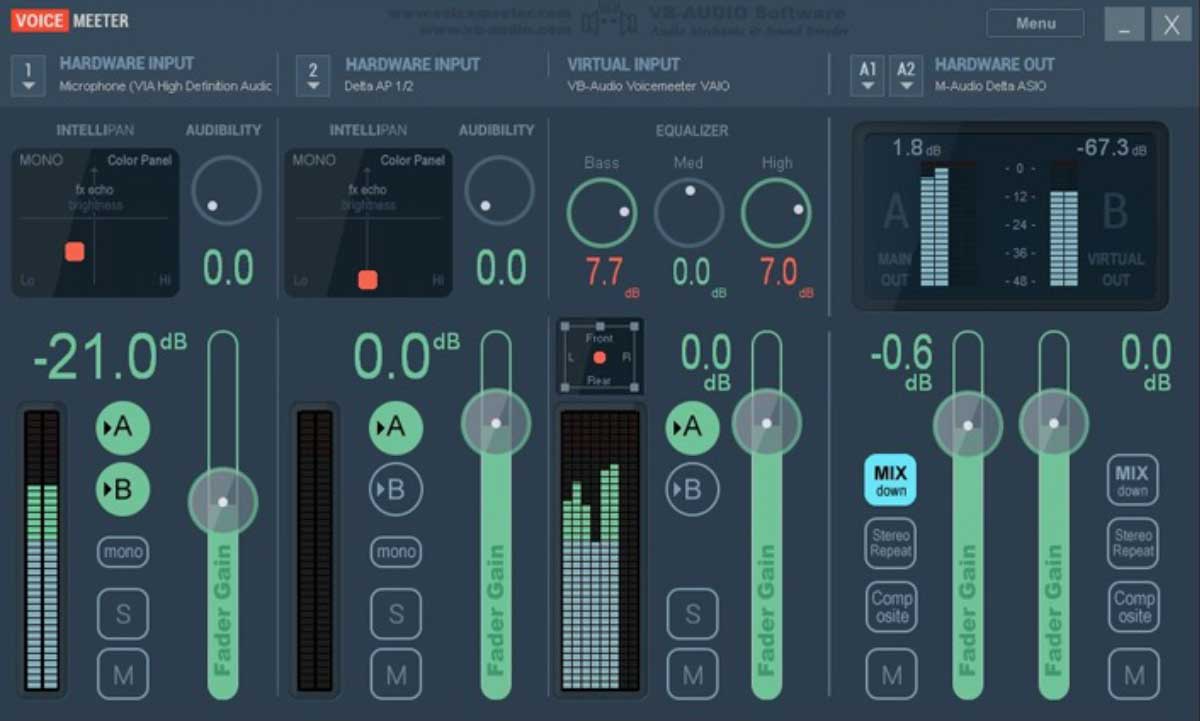

1
Physical Inputs
Devices connected to the PC (microphone)
2
Virtual Inputs
Provide a way to separate out audio from various applications into distinct inputs
3
Physical Outputs
Provides a method to route audio channels to distinct physical outputs (speakers, headsets)
4
Virtual Outputs
Provide a method to route audio channels to distinct virtual outputs
VoiceMeeter – Physical I/O
First step in configuring VoiceMeeter is to setup your physical devices. This includes devices that are physically connected to your computer for output (speakers, headphones, audio mixers), as well as input (such as a microphone, audio mixer, audio interface, etc.).
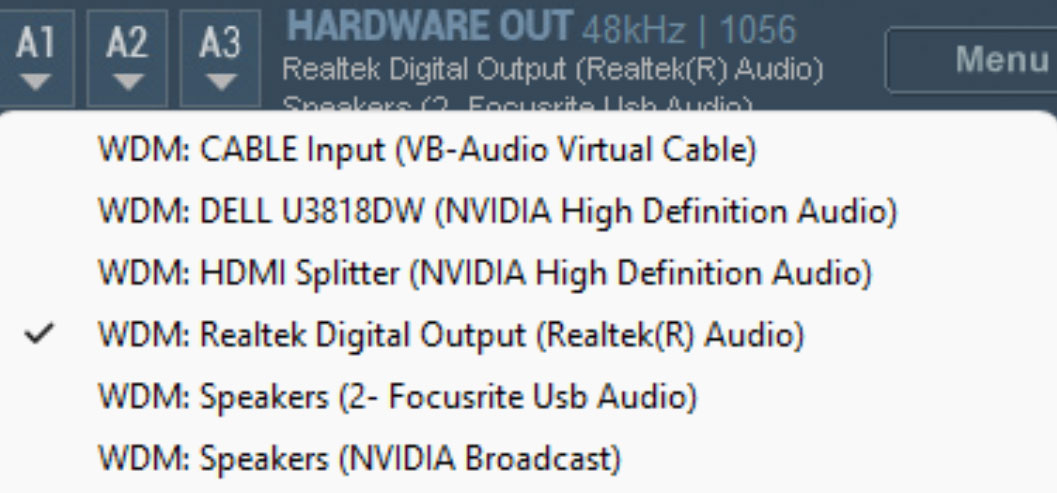
- Select the main audio Output device – general recommendation is to start with the A1 bus.
- Click on A1 to bring up the list of devices and select your main audio output.
- Order of preference is to select ASIO device (if present), then WDM/KS, then MME.
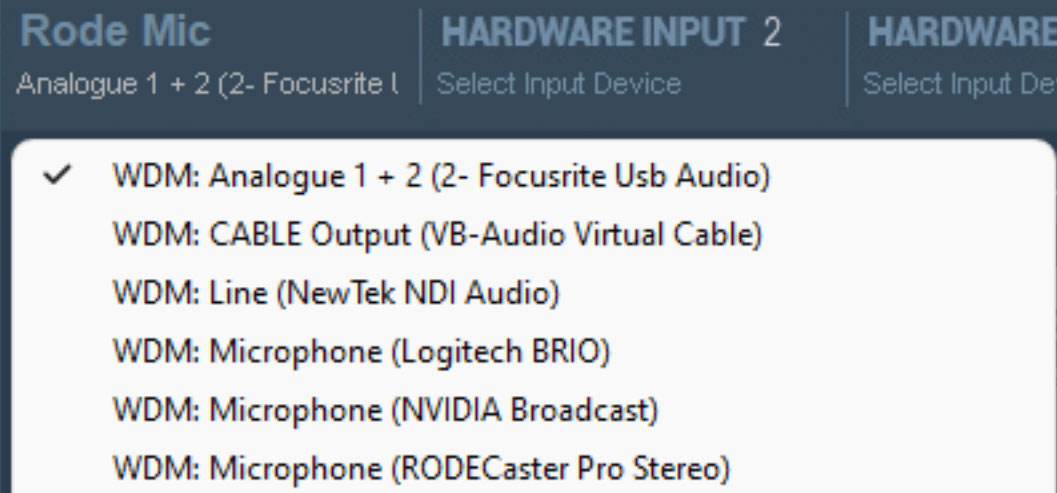
- You can configure up to 5 hardware inputs in VoiceMeeter Potato.
- Click on Select Input Device to bring up the menu and select the desired device.
- Preference is to select a WDM/KS device (provides best latency compared to MME).
VoiceMeeter – Virtual I/O
Voicemeeter also provides virtual input and output devices. These can be used to separate audio from applications on your PC into distinct channels and route them to dedicated channels for use in other applications such as Teams.
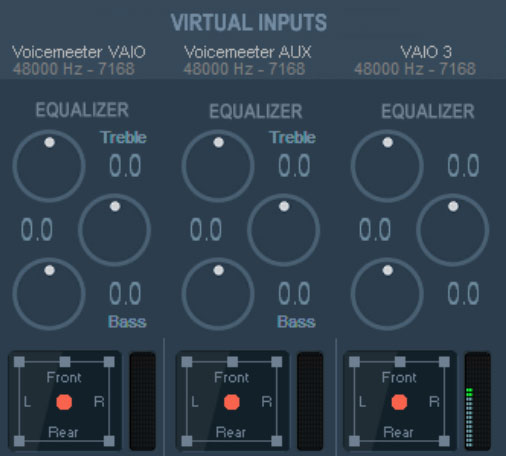
- Potato provides three virtual inputs:
- VoiceMeeter VAIO
- VoiceMeeter AUX
- VoiceMeeter VAIO 3
- Using Windows Volume Mixer settings, you can route individual applications to use specific virtual inputs.
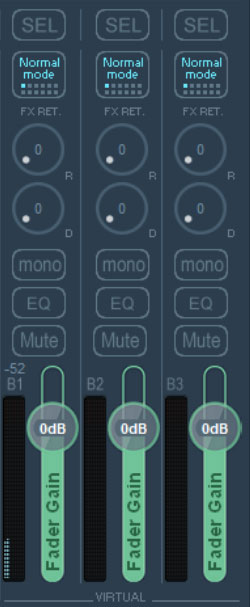
- Potato provides three virtual outputs:
- VoiceMeeter VAIO (Bus B1)
- VoiceMeeter AUX (Bus B2)
- VoiceMeeter VAIO 3 (Bus B3)
- Audio can be assigned to Bus B to route to a specific application as an input (such as a microphone in Teams).
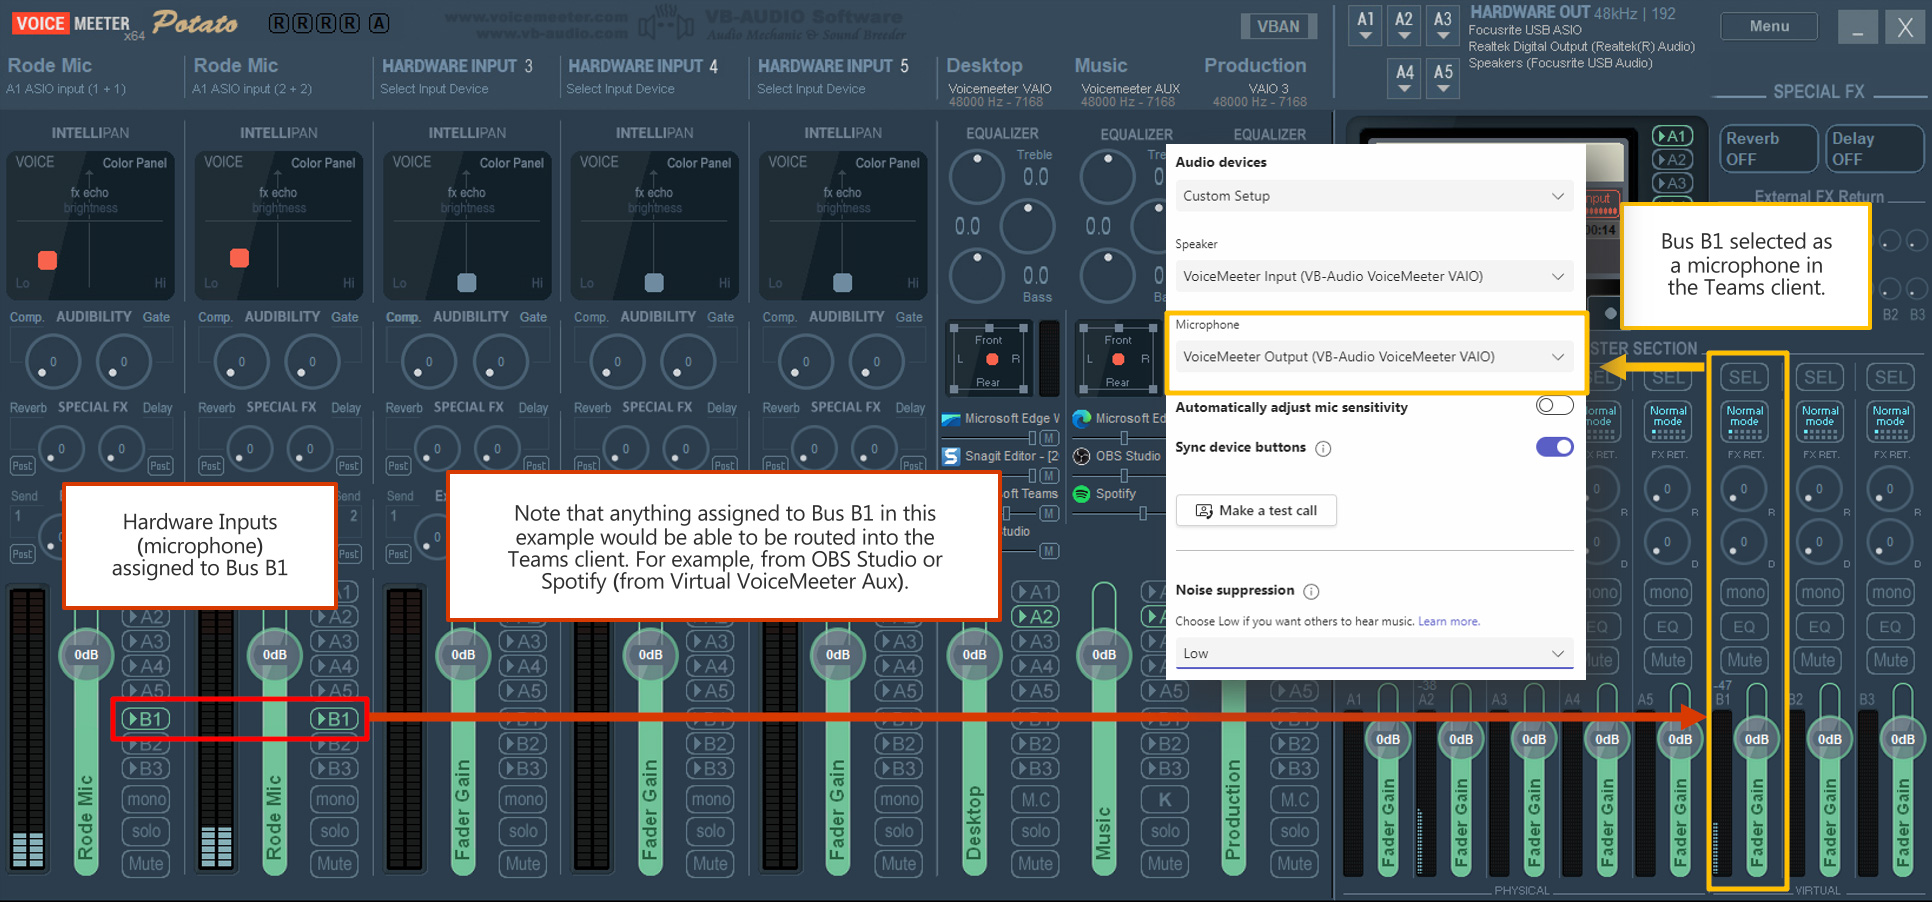
VoiceMeeter – Routing audio into Teams
You can map the virtual outputs (bottom right) into Teams using Bus B. In this example, B1 will appear as “VoiceMeeter Output (VB-Audio VoiceMeeter VAIO)” in the microphone settings for the Teams client.
Live sign language interpretation

Integrating live sign language interpretation into Teams live events and meetings
- On-screen sign language interpretation is a natural and visual form of communication that helps event producers be inclusive to deaf and hard of hearing communities, in their native language.
- Many technical and production factors should be considered when planning for an event that will incorporate live sign language interpretation.
- The following outlines recommendations and best practices for producing live events that incorporate sign language interpreters.
Prepare your interpreter team
sign language interpretation is a complex, mental task which is greatly benefited by providing additional context and advance preparation.
Supply preparation materials to your interpretation team at least one week prior to the event. Include as many details as possible including Run of Show, participant names, event visuals such as PowerPoint decks, pre-recorded videos, and transcripts.
Invite Interpreters to event rehearsals and pre-production meetings to answer questions regarding content or event flow.
Rehearse all technical elements in a pre-production session with the interpreter team. Supply technical instructions on how your specific event is produced in case Interpreters are unable to attend pre-production sessions or have last minute staffing changes.
Technical production
*Many other broadcast solutions can utilize NDI such as vMix and Wirecast. This guide only covers OBS Studio.
Interpreter studio recommendations
Internet
For any event, a strong, stable internet connection is recommended; a hardwire connection is the most stable.
Lighting
Soft, even lighting allows for the most optimum viewing of the interpretation and facial expressions.
Background
A solid color background is best; some viewers have reported to prefer chroma blue or green.
Wardrobe
Plain, solid color clothes that contrast with skin color.
Camera placement
Medium frontal shot at eye level.
Production Recommendations
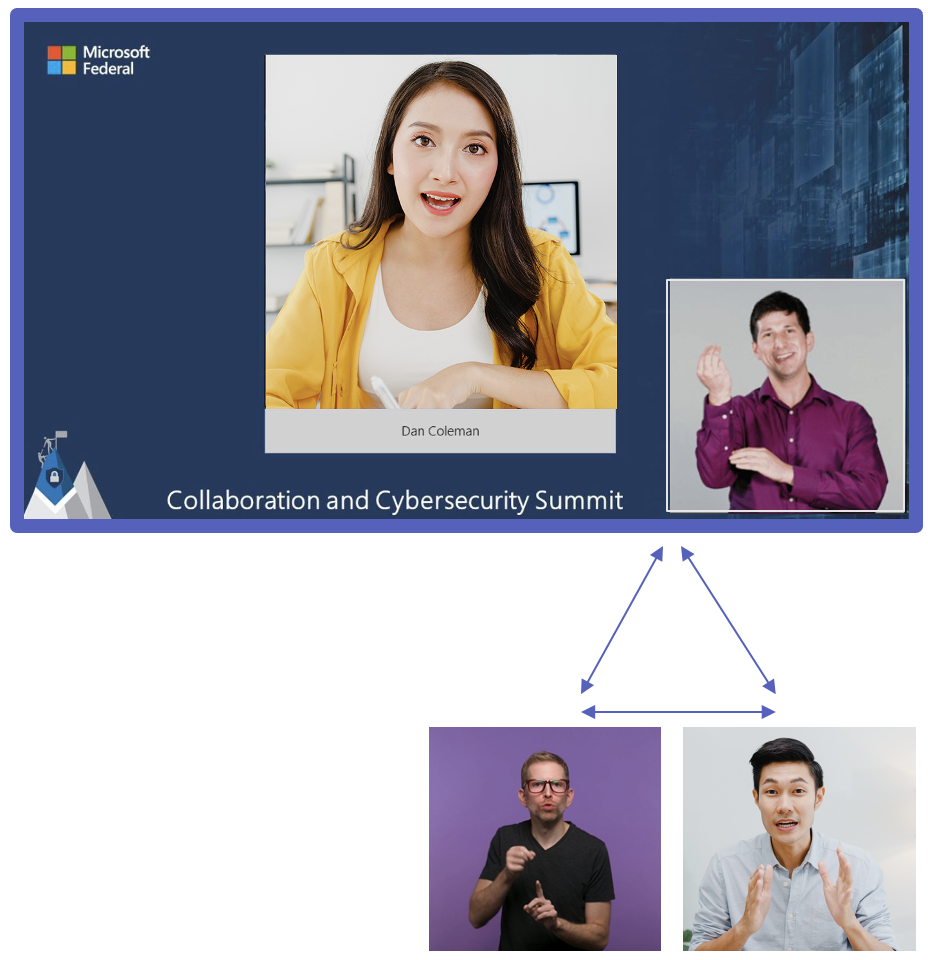
Place the Interpreter in a framed rectangular box with approximately ¼ of the screen width.
Frame the Interpreter to include space for typical signing movement.
Bottom right part of the screen is the most popular location amongst viewers.
A Virtual Green Room is an additional Teams meeting which allows for inter-team communication before and during an event. This meeting is separate from the Presenter Broadcast Teams meeting.
Interpreters cannot be in two meetings at once, so they must leave the Virtual Green Room Teams meeting to join the Presenter Broadcast Teams meeting, at an agreed time, before their Interpretation session begins.


Interpreter virtual green room

Virtual green room
Teams meeting 1
Presenter & Interpreter
Teams meeting 2
Interpreter switching recommendations
Interpreters typically work in a team of two or more and alternate every 15 to 20 minutes throughout an event. For events over two hours, a larger team of Interpreters may be necessary.
Switching Interpreters’ mid-event should be well planned and rehearsed.
Agree in advance on a switch signal between Interpreters and production.
After the signal, production should wait to switch until Interpreter removes their hands from the frame.
Where possible, integrate interpreter switching into the Run of Show. Prepare for unscheduled interpreter break requests as needed.
Alternate every 15-20 minutes.
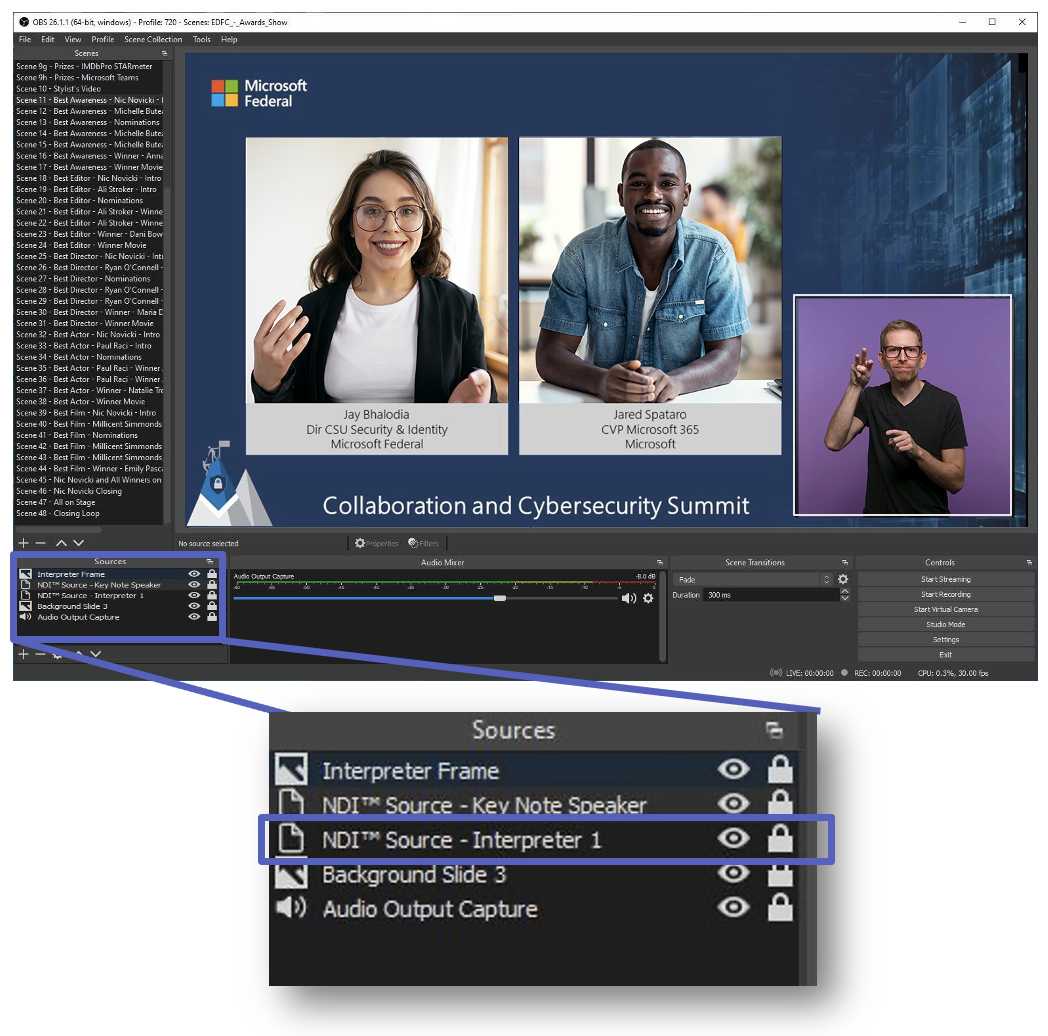
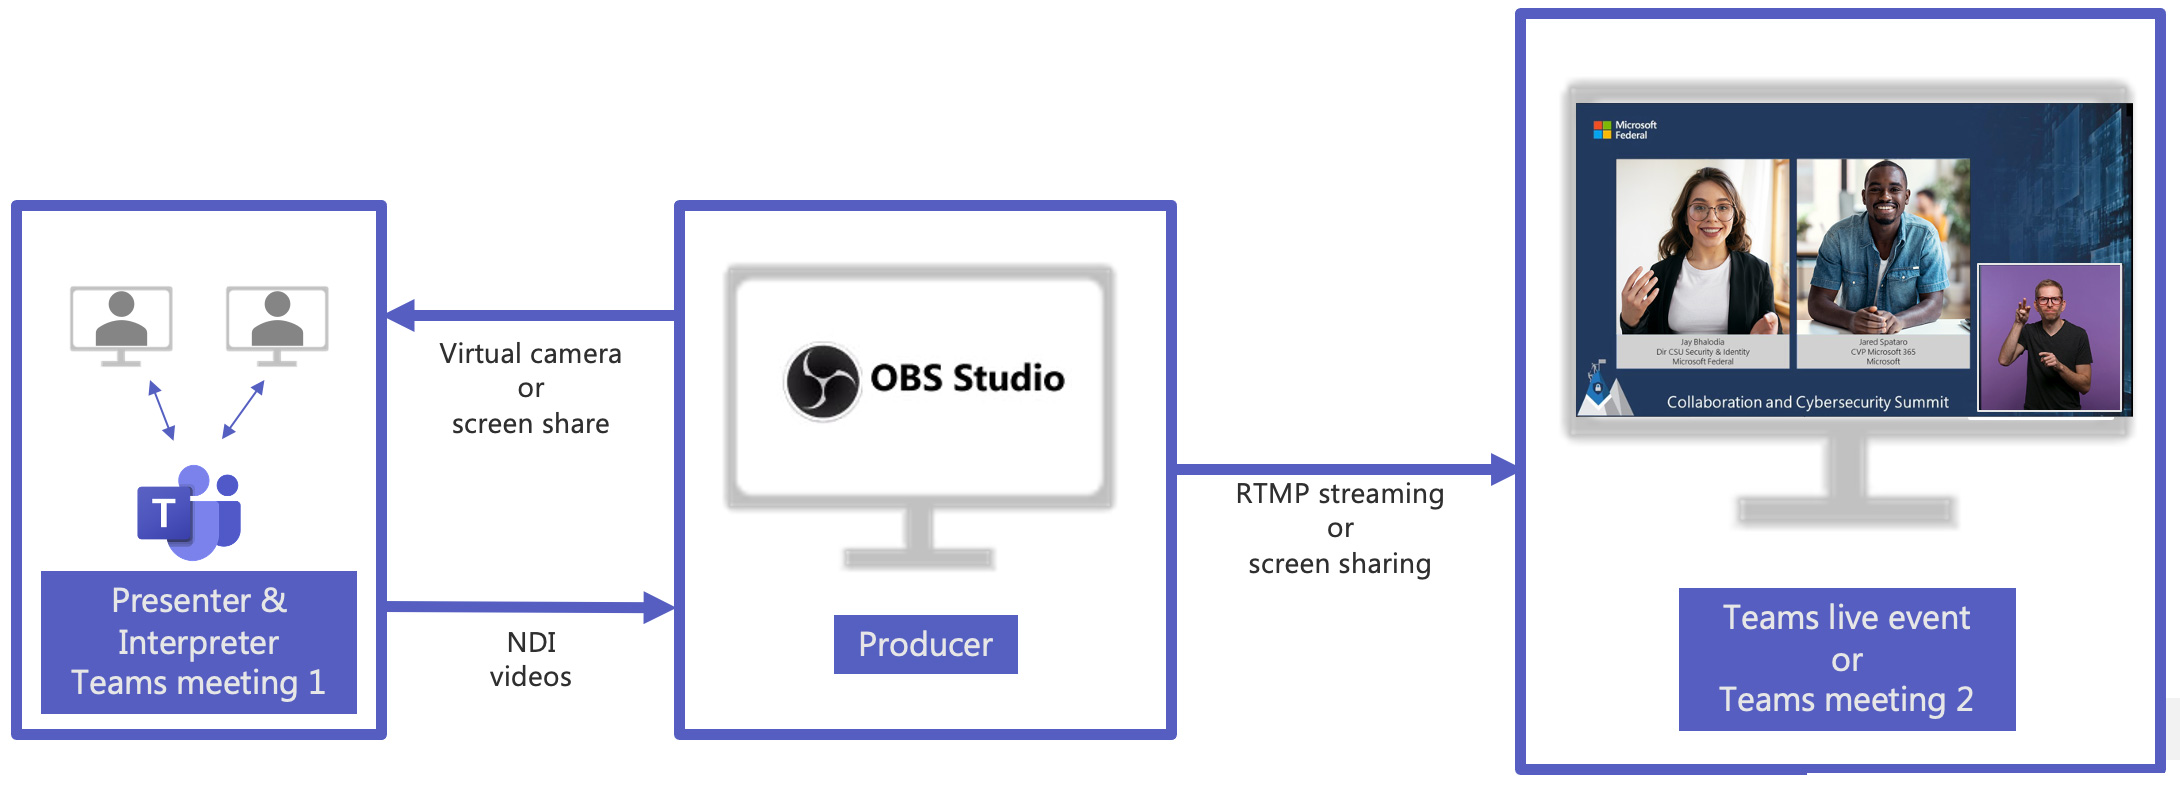
Using OBS + NDI to integrate sign language into Teams
Add interpreter NDI source to your OBS scene, above the background.
- Fit to approximately ¼ of screen width.
- Keep proportional.
- Place in lower right corner.
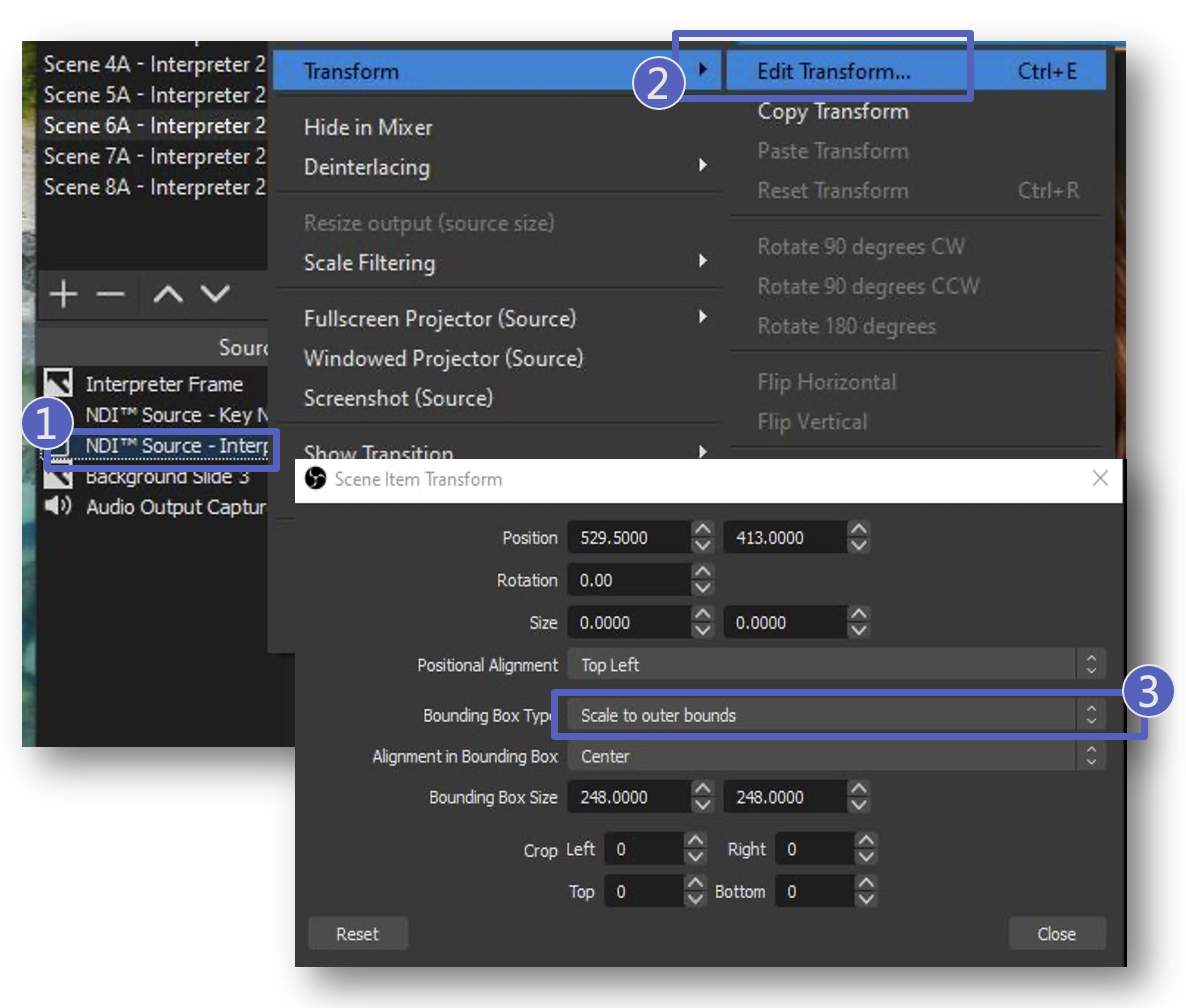
Apply bounding box to all NDI sources to prevent auto scaling:
- From the Sources pane, right click NDI Source.
- Hover over Transform, click Edit Transform.
- From Bounding Box Type select Scale to outer bounds.
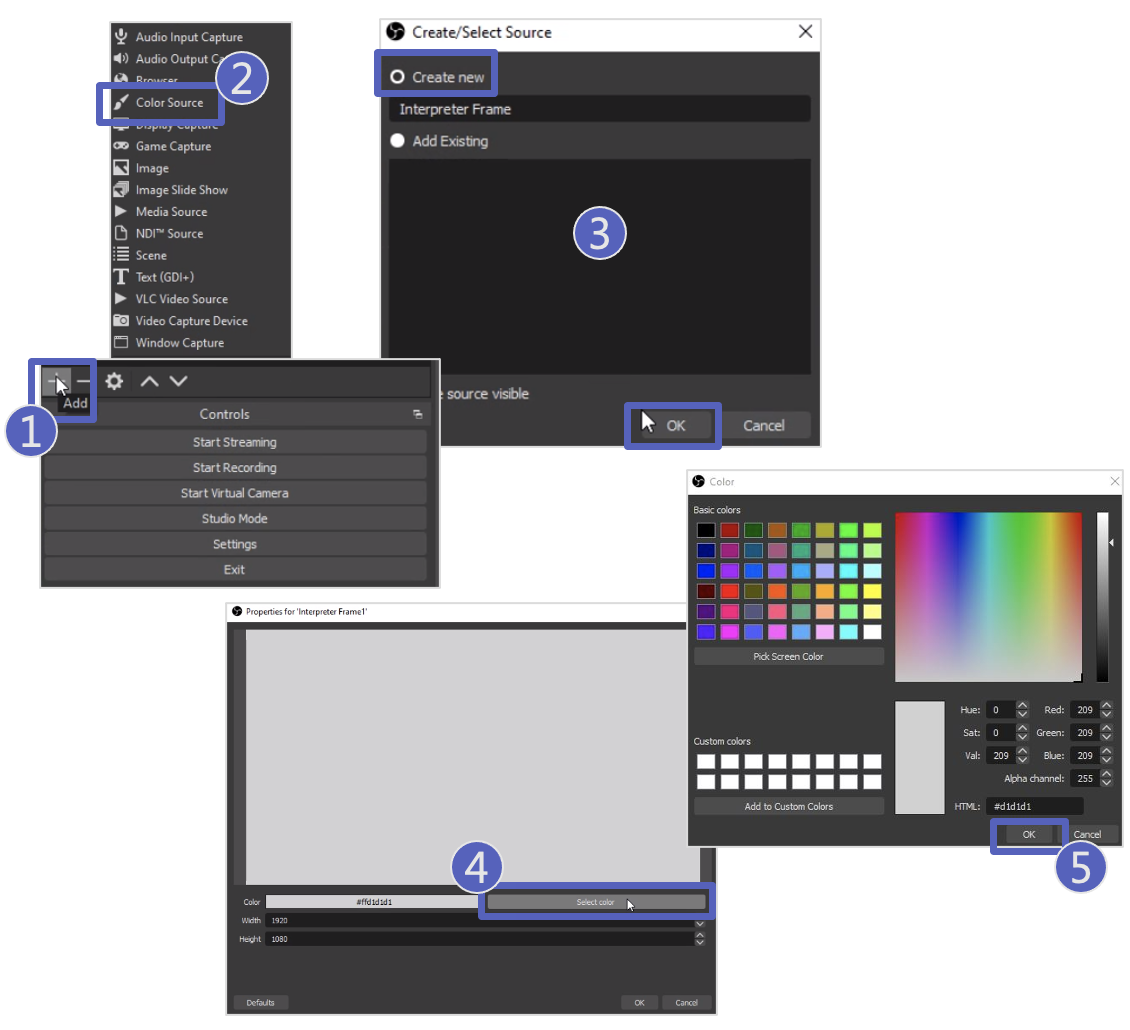
Create a frame:
- From the Sources pane, click + button.
- Select Color Source.
- Select Create new, provide a name, click OK.
- Click Select color.
- Select desired frame color, click OK.
Click and drag to adjust color source size and place the frame above the NDI source in the Source pane.
Program output to Interpreter
Supplying the program output to the Interpreter is critical to aid in understanding the Presenter/Speaker and providing additional visuals the Interpreter needs to bring to the attention of the audience.
Use either Share Screen to share back to the Presenter Teams meeting or use OBS Virtual Camera/NewTek Virtual Camera to route the program feed back to the Interpreter meeting.
Interpreter gives the “look” sign to let viewers know to look at the visuals on-screen.
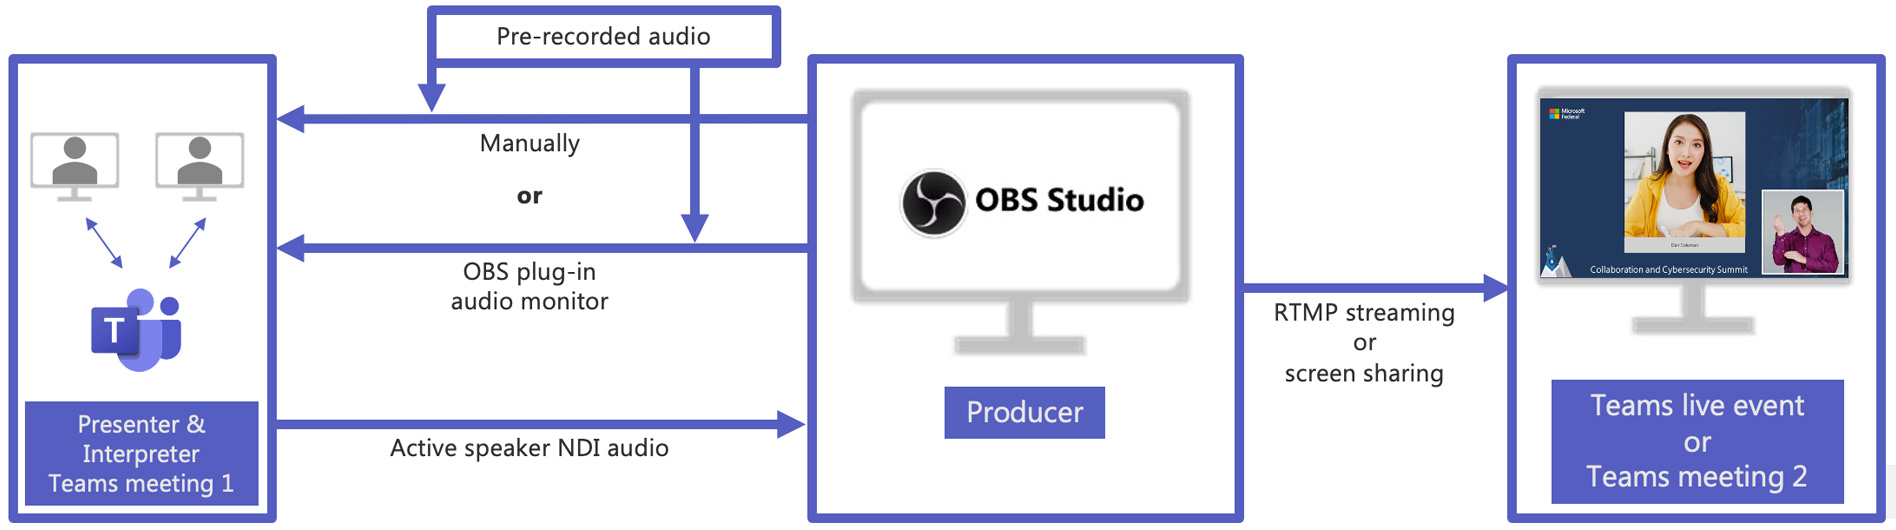
Audio routing in OBS
Additional pre-recorded material, that requires translation, must be routed to the Interpreter. Do not set the OBS Program Audio output to return to the Presenter Teams meeting as it causes a feedback loop. Returning just the pre-recorded content requires advanced audio routing.
Producers can manually turn on and off audio for pre-recorded elements to avoid feedback or use software or hardware audio routing.
Our recommendation is to use the OBS Plug-in “Audio Monitor”: this allows for routing selected sources to an additional output.
Interpreter switching in OBS
Scheduling interpreter switches for specific breaks ahead of time is ideal. With a live event, planned switches may need to change for a variety of reasons. Use duplicate scene sets to seamlessly transition to new Interpreters at any point in the program.
Creating Duplicate Scene Sets
- Right click a Scene in the Scenes pane
- Select Duplicate
- Type in desired scene name, click OK. Repeat for all Scenes.
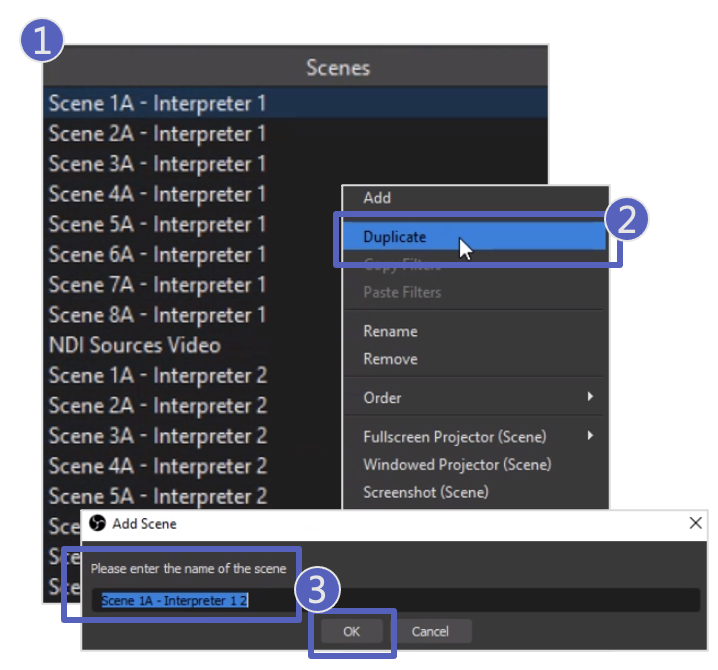
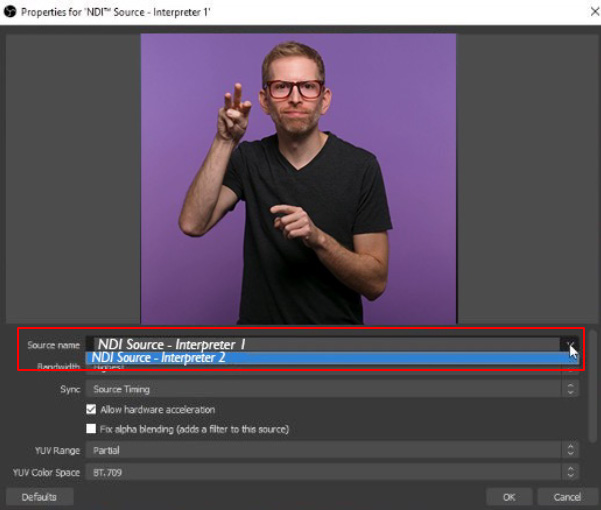
Appropriately assign the different interpreters NDI source for each Scene Set.
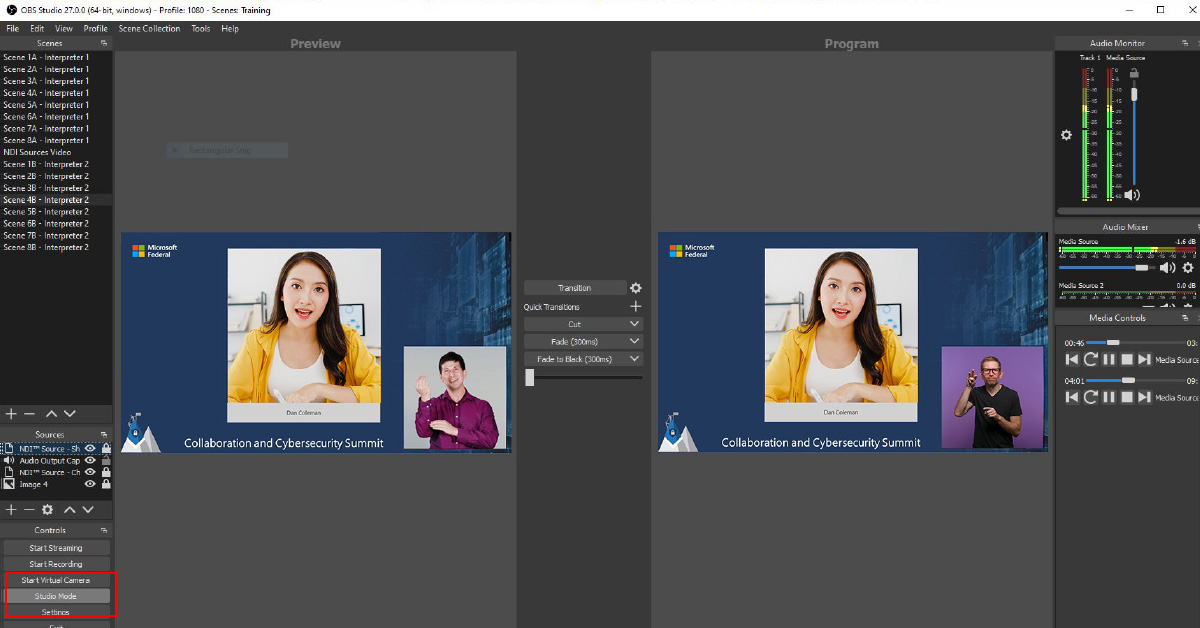
Use OBS Studio Mode to preview the next Interpreter prior to a seamless transition.
Continue to phase 3: After the event
Proceed to the final phase of our virtual event guidance on managing, producing, and executing your custom production event.
Continue playbook